Pixel Targeting
Targeting Adjustments by Color or Tone
While tools are used to make a variety of global adjustments to an image and the Edit Brush makes it possible to adjust specific sections of the image, Pixel Targeting allows for the selection of distinct tones, colors, and skin tones. Pixel Targeting applies a number of adjustments to a photo's individual colors or tones, or just to skin tone. For example, in Edit mode, open an image and add an Exposure filter from the toolbar and note that the exposure is adjusted over the entire image. However, to only adjust the exposure of a blue sky in an image, enable Pixel Targeting by clicking the Pixel Targeting button located in the image header bar and use the color wheel to target the color blue, thereby only increasing the exposure on the sky.
Pixel Targeting is available in the following filters:
- Skin Tune
- Chromatic Aberration
- Vignette
- Special Effects
- Grain
- Exposure
- Levels
- Auto Levels
- Tone Curves
- Light EQTM
- Dehaze
- White Balance
- Color EQ
- Color Wheel
- Tone Wheels
- Color LUTs
- Split Tone
- Convert to Black & White
- Sharpen
- Blur
- Noise
- Clarity
Pixel Targeting can also be accessed by right-clicking a layer in the Layers pane and selecting Pixel Targeting... from the context menu.
To perform targeted adjustments with Pixel Targeting:
- Open any of the above filters in the Filter Menu pane, or select one the menu options above.
- In the image's header bar, click the Pixel Targeting button.

- In the Pixel Targeting pane, configure the settings for Target Tones and Target Colors as described below.
- Adjust the selected filter or menu option's settings. The adjustments will only affect the targeted color or tones, not the entire image.
The Pixel Targeting Pane
![]()
The Pixel Targeting pane consists of three sections:
- Presets
- Luminance Range, and
- Color Range.
Pixel Targeting Pane Sections
| Presets | Make a selection from the Presets drop-down list, or click the Save Preset icon to populate the new preset to the Presets drop-down list. | ||
|
|
Show Mask Preview |

|
Click the icon to view a preview of the mask that highlights the pixels to be targeted. |
| Reset |

|
Click the icon to remove all of the current image edits and return the image to its original state. | |
| Help |

|
Click the icon to open the Pixel Targeting help file. | |
|
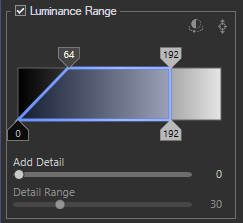
Luminance Range |
The Luminance Range field set is used to target tones of brightness for adjustment. Enable the Luminance Range checkbox to enable the associated functionality. | ||
|
Invert Selection |

|
Click the icon to change the selected pixels to the unselected pixels. |
| Indicator Line |

|
Click the icon to add an indicator line to the Tone Grabber display and produce an eyedropper for indicating where a tone from the image appears in the graph. | |
| Tone Grabber | Use the four slider tabs to make a tonal selection. The area inside the blue box represents the tonal selection. The top two tabs cannot slide past one another. Each of the bottom tabs cannot slide past their own top tab when sliding toward the center. The tonal range is between 0 and 255. A diagonal line between the top and its associated bottom slider tab will produce a feathered selection effect (64 to 0 in the Luminance Range example). A straight line connecting the top and associated bottom slider tab will produce a hard cut-off (192 to 192 in the Luminance Range example). | ||
| Add Detail | Increase the slide value to sharpen the crispness around the edge of the selection. | ||
| Detail Range | If the Add Detail slider has been advanced past a value of "0", the Detail Range slide is enabled for controlling the range of the edge detail added by the Add Detail slider. | ||
|
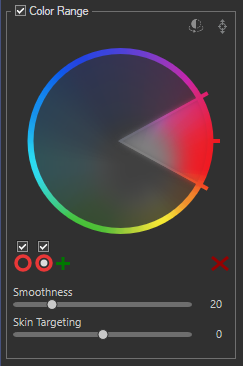
Color Range |
The Color Range field set is used to target specific colors for adjustment. Enable the Color Range checkbox to enable the associated functionality. | ||
|
Invert Color |
|
Click the icon to invert the selected colors on the wheel. |
| Color Indicator |
|
Click the icon to display and produce an eyedropper for selecting color pixels in the image. Hold down the Alt key and click with the eyedropper to make a color selection. | |
| Color Wheel | Use the Color Wheel to adjust precise colors in an image. The Color Wheel is particularly useful for common requests like making a blue sky more blue, or brightening dark water that is meant to depict a bright lake. The selected color is displayed in the circle below the Enable Wheel checkbox. For more information on the Color Wheel, see Adjusting Color with the Color Wheel. | ||
| Enable Wheel | Located above the Wheel Selection circle displaying the selected color, enable the checkbox to make the associated wheel active. | ||
| Add Wheel | + | Click the icon to make changes to another color using an additional color wheel. | |
| Wheel Selection | Located directly beneath the Enable Wheel checkbox, click the inside circle to select the associated color wheel. The selected color is represented by the wheel. | ||
| Delete Wheel | 
|
Deletes the currently selected color wheel. | |
| Smoothness | Increase the slider to adjust smoothness, which acts like a feathering tool to soften a color's edges. | ||
| Skin Targeting | Using the Skin Targeting slider will disable the rest of the Color Range field set and allow only skin tones to be targeted. | ||
You can right-click a slider to reset to the default value.
Pixel Targeting becomes even more powerful when paired with Selections or the Edit Brush. These tools in combination with Pixel Targeting make it possible to target very precise areas, such as only the blue of a person's eyes, rather than all of the blue in the image.
Click Reset to clear changes and reset to default settings.
Save setting values as a preset for future use. Using the Save Preset button on the Pixel Targeting pane will only save Pixel Targeting settings, and not the settings on the filter. Filter settings must be saved separately.